Improving Desk Device Utilization with Networking
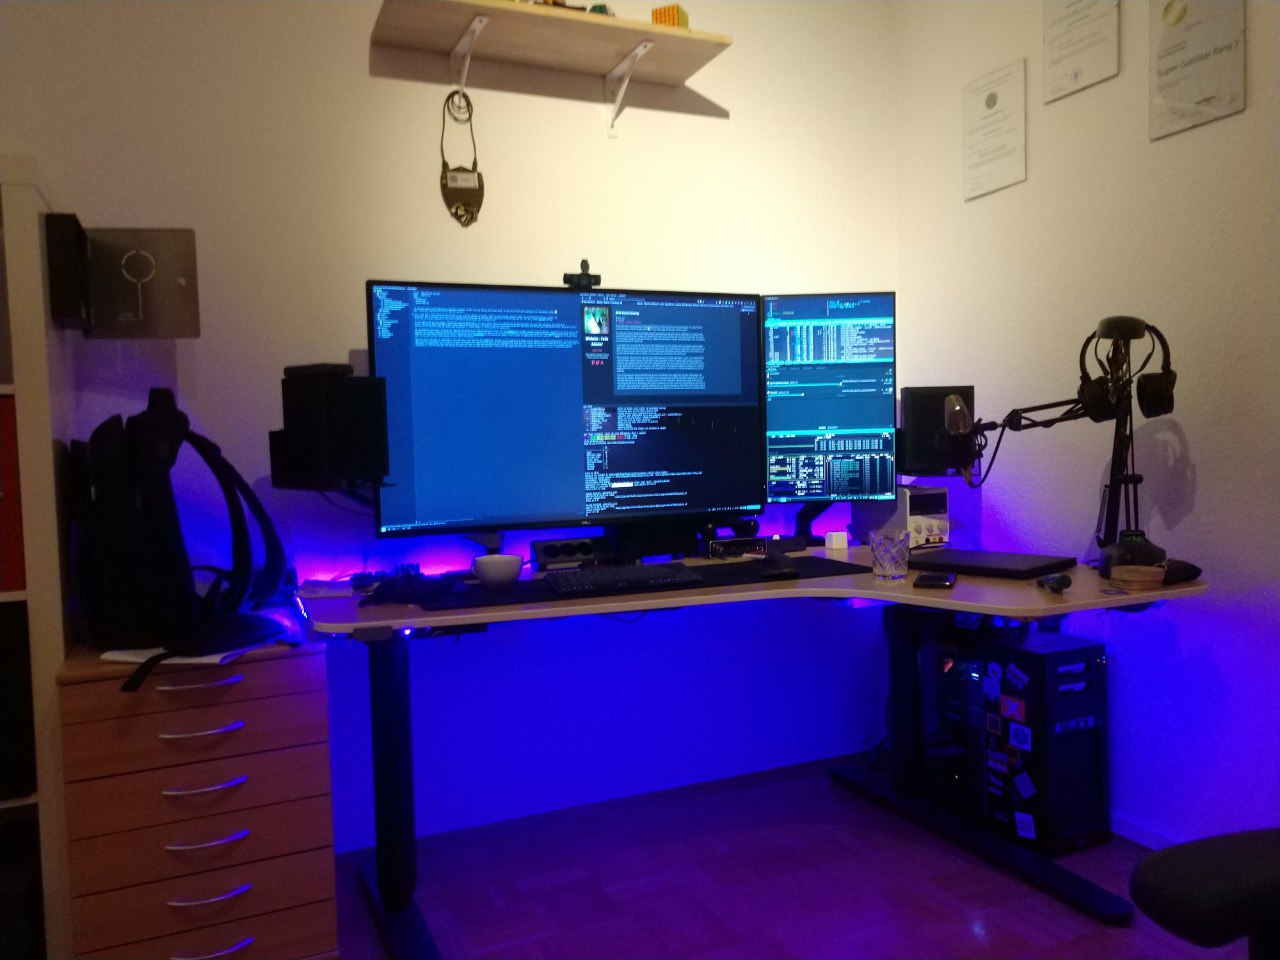
In the past month I have renovated my appartment. Because of this I had to redo my entire desk setup. If you know me that means spending a lot time managing cables 😅. But I am really happy with the result. See for yourself …
I always wanted to be flexible in how I use the devices on my desk. I want to switch between using my laptop and desktop without having to replug everything. But I also want to be able to use certain devices from both at the same time. I have been using USB Hubs and the like. But I always was left wanting. To be fair my current solution is still not as perfect as in my dreams, but it is damn close.
So lets begin with the easy things. The monitors have multiple inputs, so I just connect those to my desktop and the docking station and voila. Well switching still requires me to use the monitor menus, but that I don’t really need to do that because I set them to “automatic mode” meaning the just show which ever device starts sending data first. And I don’t really need to use all monitors with the laptop when my desktop is running anyway so switching does not happen much.
For the keyboard and mouse I am using the “Logitech MX” keyboard and “Logitech MX Master” mouse. The can be paired with multiple Logitech wireless receivers. The devices can the be switch with the press of a button. Sadly switching one does not switch the other automatically which is still a little annyoing but I have seen some scripts that could be used to automate that as well. Maybe I will give that a shot. I still have a “USB Switch” which is connected to the desktop and laptop, it has a switch to toggle which device is “connected”. I mostly use it for my yubikey now. It also was fine for switching my previous mouse and keyboard.
There is still some room for improvements here, but that is not what has been bugging me. The parts I really wanted to be better are the Speakers, Microphone and the Webcam. In an ideal world they should be accessible on either device or both at the same time. Hence the USB Switch is not a good solution since that only enables operation with a single device at a time. Also using the USB switch is annyoing for other reasons. It means the audio dac is reset when switching devices resulting in an unpleasent noise coming out of my speakers. And also having all devices connected to a switch takes away the ability to attach usb sticks or other devices that i really only need temporarily and daisy chaning usb hubs often results in inconsistent behavior.
What would be a better solution?
Enter everybodies favorite single board computer the Raspberry Pi 🥧. Luckly I still have one lying around since getting one online is next to impossible if you don’t want to pay a scalper an unreasonable amount of money. Hopefully this will change. But anyway how can it help me acomplish my goal.
Thanks to a little something called networking computers can talk to each other. So it should be possible to attach the audio dac and webcam to the pi and then stream the video and audio data to both the laptop and desktop. What do we need to accomplish that.
- Configure the Network
- Setup Pipewire to run as system service
- Enable audio streaming with the pipewire pulse server implementation
- Enable laptop and desktop to discover audio devices
- Setup USBIP for sharing the webcam
Network Setup
I do not want to share the devices with my entire home network, I just want to share with devices attached to the desk. Since the raspberry only has one network jack and using wireless for streaming data is not a great idea because of increased latency, the first thing I did was setup VLAN that is only availible to the devices on my desk.
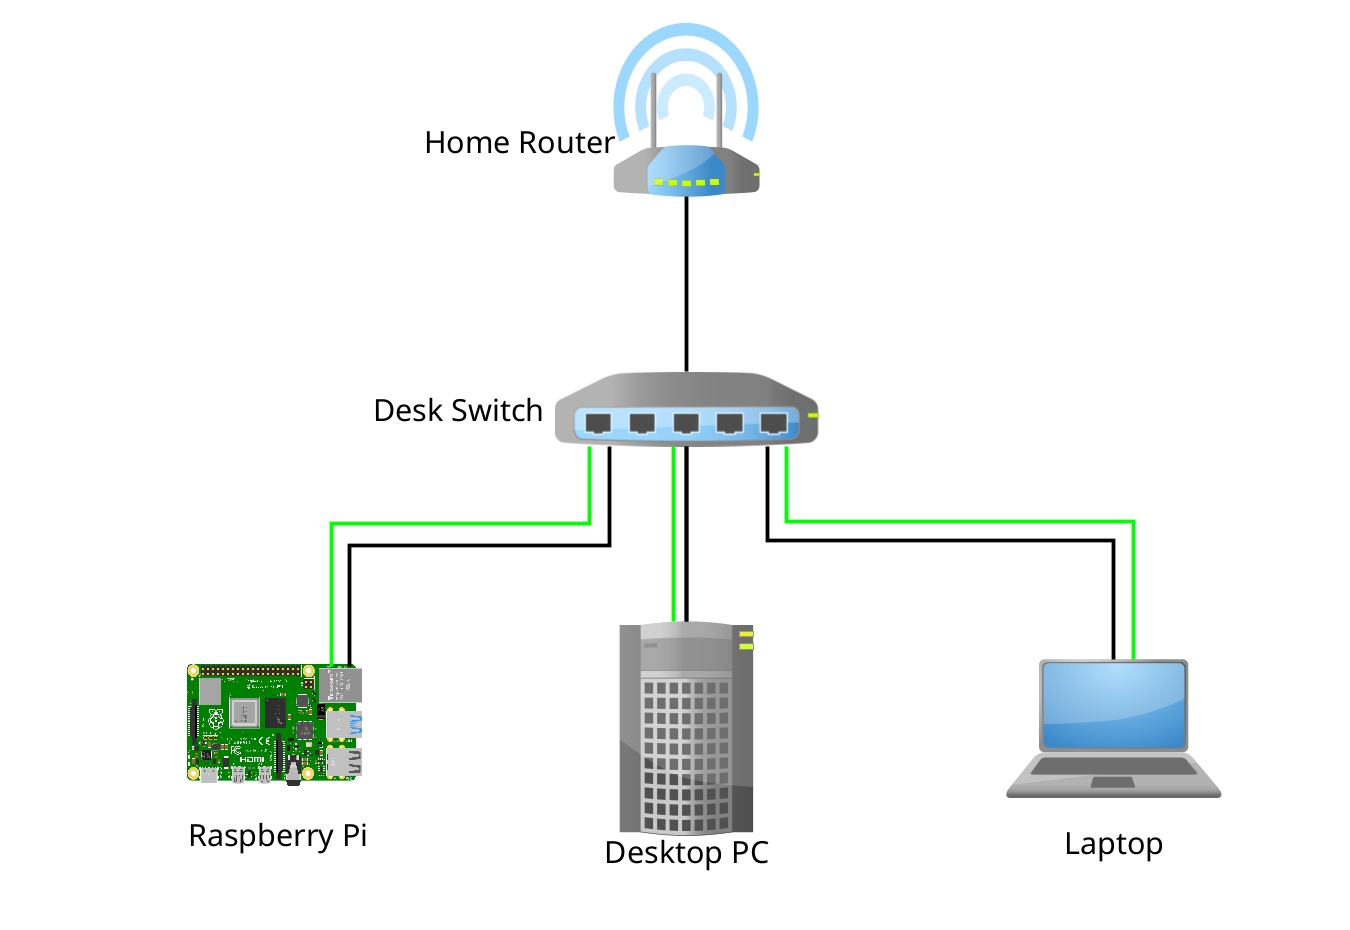
First of the network switch needs to support VLANs, there are a lot of switches capable of doing this. They are a little more expensive then unmanged switches, but a basic models are availible starting at around 30€. I opted for a more expensive model from microtik (CSS610-8G-2S+) that is also able to support fibre glas connections instead of just RJ45. Then I configured the switch to setup the home network on each port in untagged mode. Then I created a VLAN with ID 2668 which will only be availible on the ports attached to the raspberry pi, desktop and laptop in tagged mode. The choise of the ID is arbirary, just make sure to not have clashes with other VLAN if you already have a more elaborate network setup at home.
Next the devices need to be configured to know about the VLAN and the IP address range needs to be configured. I like to use systemd-networkd for this. The configuration
is done with three files in the /etc/systemd/network directory.
[root@pi ~]# tree /etc/systemd/network
/etc/systemd/network
|-- 0-audio.netdev
|-- 1-audio.network
`-- eth.network
The file 0-audio.netdev defines the VLAN:
[NetDev]
Name=audio
Kind=vlan

[VLAN]
Id=2668
The file eth.network configures the normal home network on the pi, here we need to add a line specifing that the VLAN is availible on this port:
[Match]
Name=eth*

[Network]
DHCP=yes
IPv6PrivacyExtensinos=true
VLAN=audio
Lastly the VLAN network needs to be configured. Since the pi is running continously it is useful to configure its ip statically and setup a DHCP server.
All of this is configured with just a few lines in the 1-audio.network file.
[Match]
Name=audio

[Network]
Address=172.16.128.1/24
DHCPServer=true

[DHCPServer]
PoolOffset=100
PoolSize=100
EmitRouter=false
The same steps are used to configure the VLAN on the desktop and laptop, the only things that change are the interface names for the home network and that the audio vlans network can use the configured DHCP server to obtain a lease. Resulting in the follwing 1-audio.network file on the clients.
[Match]
Name=audio

[Network]
DHCP=yes
Of course to use systemd-networkd the service needs to be enabled: systemctl enable --now systemd-networkd.
Pipewire System Service
Pipewire intends to be a modern linux media deamon. It is still in active development. For now it already can be used as a replacement for pulseaudio or jack. Normally pipewire starts when you login to your user session. But since there is no desktop running on the pi pipewire needs to be configured to run as a system service.
First of the software packages need to be installed. I am more of a minimalist when it comes to the systems I configure, means I am running archlinux on the raspberry pi. The packages names might vary if you are running raspbian. For me doning
pacman -S pipewire pipewire-alsa pipewire-jack pipewire-pulse pipewire-zeroconf wireplumber pipewire-docs pipewire-audio realtime
installed all desired packages. There is not a lot of documentation on how to setup pipewire as a system service. I found this issue thread which lists all the steps required. Maybe the process will get simpler in the future, but for now a lot of steps are required.
First a pipewire user and group needs to be created with a statically assigned uid and gid. This is important to correctly set the environment variables in the service files created later. The pipewire user needs to be added to the audio and realtime group.
addgroup --gid 901 pipewire
adduser --system  --uid 091 --gid 901 pipewire
for g in audio realtime; do sudo adduser pipewire ${g}; done
Next we need to add a configuration file /etc/security/limits.d/99-realtime-privileges.conf to allow the realtime group to change the process priorities to the levels recommended
by pipewire.
@realtime - rtprio 98
@realtime - memlock unlimited
@realtime - nice -11
With the limits in place, the next step is to setup systemd units for pipewire, pipewire-pulse and wireplumber. In total 5 files need to be created:
/etc/systemd/system/pipewire.socket/etc/systemd/system/pipewire.service/etc/systemd/system/pipewire-pulse.socket/etc/systemd/system/pipewire-pulse.service/etc/systemd/system/wireplumber.service
The content of these files is as follows.
#/etc/systemd/system/pipewire.socket
[Unit]
Description=PipeWire Multimedia System Socket

[Socket]
Priority=6
ListenStream=%t/pipewire/pipewire-0
SocketUser=pipewire
SocketGroup=pipewire
SocketMode=0660

[Install]
WantedBy=sockets.target
#/etc/systemd/system/pipewire.service
[Unit]
Description=PipeWire Multimedia Service
Before=gdm.service

# We require pipewire.socket to be active before starting the daemon, because
# while it is possible to use the service without the socket, it is not clear
# why it would be desirable.
#
# Installing pipewire and doing `systemctl start pipewire` will not get the
# socket started, which might be confusing and problematic if the server is to
# be restarted later on, as the client autospawn feature might kick in. Also, a
# start of the socket unit will fail, adding to the confusion.
#
# After=pipewire.socket is not needed, as it is already implicit in the
# socket-service relationship, see systemd.socket(5).
Requires=pipewire.socket

[Service]
User=pipewire
Type=simple
ExecStart=/usr/bin/pipewire
Restart=on-failure
RuntimeDirectory=pipewire
RuntimeDirectoryPreserve=yes
Environment=PIPEWIRE_RUNTIME_DIR=%t/pipewire
# Add if you need debugging
# Environment=PIPEWIRE_DEBUG=4

# These hardcoded runtime and dbus paths must stay this way for a system service
# as the User= is not resolved here 8(
## NOTE we do not change PIPEWIRE_RUNTIME_DIR as this is the system socket dir...
#Environment=PIPEWIRE_RUNTIME_DIR=/run/user/91/pipewire
Environment=XDG_RUNTIME_DIR=/run/user/91
Environment=DBUS_SESSION_BUS_ADDRESS=unix:path=/run/user/91/bus
#/etc/systemd/system/pipewire-pulse.socket
[Unit]
Description=PipeWire PulseAudio
Conflicts=pulseaudio.socket

[Socket]
Priority=6
ListenStream=%t/pulse/native
SocketUser=pipewire
SocketGroup=pipewire
SocketMode=0660

[Install]
WantedBy=sockets.target
#/etc/systemd/system/pipewire-pulse.service
[Unit]
Description=PipeWire PulseAudio

# We require pipewire-pulse.socket to be active before starting the daemon, because
# while it is possible to use the service without the socket, it is not clear
# why it would be desirable.
#
# A user installing pipewire and doing `systemctl --user start pipewire-pulse`
# will not get the socket started, which might be confusing and problematic if
# the server is to be restarted later on, as the client autospawn feature
# might kick in. Also, a start of the socket unit will fail, adding to the
# confusion.
#
# After=pipewire-pulse.socket is not needed, as it is already implicit in the
# socket-service relationship, see systemd.socket(5).
Requires=pipewire-pulse.socket
Wants=pipewire.service pipewire-session-manager.service
After=pipewire.service pipewire-session-manager.service
Conflicts=pulseaudio.service
# To ensure that multiple user instances are not created. May not be requiered
Before=gdm.service

[Service]
User=pipewire
Type=simple
ExecStart=/usr/bin/pipewire-pulse
Restart=on-failure
Slice=session.slice

# These hardcoded runtime and dbus paths must stay this way for a system service
# as the User= is not resolved here 8(
Environment=PULSE_RUNTIME_PATH=/home/pipewire
Environment=DBUS_SESSION_BUS_ADDRESS=unix:path=/run/user/91/bus

[Install]
Also=pipewire-pulse.socket
WantedBy=multi-user.target
#/etc/systemd/system/wireplumber.service
[Unit]
Description=Multimedia Service Session Manager
After=pipewire.service
BindsTo=pipewire.service
Conflicts=pipewire-media-session.service

[Service]
User=pipewire

Type=simple
ExecStart=/usr/bin/wireplumber
Restart=on-failure
Slice=session.slice

# These hardcoded runtime and dbus paths must stay this way for a system service
# as the User= is not resolved here 8(
Environment=XDG_RUNTIME_DIR=/run/user/91
Environment=DBUS_SESSION_BUS_ADDRESS=unix:path=/run/user/91/bus

[Install]
WantedBy=pipewire.service
Alias=pipewire-session-manager.service
For the services to work correctly we need a running user session with dbus. This can be acomplished by telling loginctl to start a pipewire user session at system boot:
loginctl enable-linger pipewire
Since running pipewire on the pi as a user is undesired the user services need to be masked.
systemctl --user --global mask pipewire.socket pipewire.service pipewire-pulse.socket pipewire-pulse.service wireplumber.service
After this the pipewire system services we just created can be enabled:
systemctl enable --now pipewire.socket pipewire.service pipewire-pulse.socket pipewire-pulse.service wireplumber.service
Configure Pipewire for Network Streaming
At this point piperwire is running on the raspberry after boot up. The next step is to setup network streaming. Thankfully that is easly done in two steps:
- Setup Pipewire on the Raspberry Pi to be reachable via the VLAN and enable publishing of its devices via zeroconf
- Setup clients (laptop, desktop) to listen for zeroconf announcements
For compatibility with the existing playback methods and to be a “drop-in” replacement pipewire has implementated a full pulseaudio server on top of itself. This way existing tools for managing audio playback and recording can still be used like pavucontrol. Pulseaudio supported being used over a network. This is not low latency so doing this over wifi is not really recommended, but over a wired connection the latencies are so low that it is not noticable. Pipewire supports this as well. So all we need to do to create a configuration file to configure network access:
# /etc/pipewire/pipewire-pulse.conf.d/network.conf
pulse.properties = {
    # the addresses this server listens on
    pulse.min.frag = 32/48000           #0.5ms
    pulse.default.frag = 256/48000       #5ms
    pulse.min.quantum = 32/48000        #0.5ms
    server.address = [
        "unix:native"
        #"unix:/tmp/something"              # absolute paths may be used
        #"tcp:4713"                         # IPv4 and IPv6 on all addresses
        #"tcp:[::]:9999"                    # IPv6 on all addresses
        #"tcp:127.0.0.1:8888"               # IPv4 on a single address
        #
        { address = "tcp:172.16.128.1:4713"             # address
          max-clients = 64                 # maximum number of clients
          listen-backlog = 32              # backlog in the server listen queue
          client.access = "allowed"     # permissions for clients
        }
    ]
}
Per default piperwire-pulse only enables the “unix:native” socket for access via dbus. To enable the network streaming the last 4 lines starting with address are of interest. In order to restict access to the VLAN the Ip address of the raspberry pi in the audio network needs to be specified. Also the client.access value needs to be set to “allowed” in order to enable all devices on that network to use it.
I also had to decrease the default values for pulse.min.frag, pulse.default.frag and pulse.min.quantum quite a bit in order for the latency of the mircophone to be usable while in a video
call. Otherwise video and audio would be very out of sink. The pipewire documentation warns that this will increase CPU usage. I have not noticed a big impact on the raspberry pi 4 I am using to
do this.
Next enabling the publishing of the pipewire server via zeroconf needs to be enabled. This could be done in the same configuration file. But for better overview over the configuration a created an extra configuration file:
# /etc/pipewire/pipewire-pulse.conf.d/publish.conf
context.exec = [
  { path = "pactl"        args = "load-module module-zeroconf-publish" }
]
Thats really short. All we are doing is to tell the pulseaudio server to enable the zeroconf publish module. And on the clients we need to enable zeroconf discovery like this:
# /etc/pipewire/pipewire-pulse.conf.d/zeroconf-discover.conf
context.exec = [
  { path = "pactl"        args = "load-module module-zeroconf-discover" }
]
For this to work the zeroconf deamon needs to be running. On linux the zeroconf implementation is provided by avahi. Most systems probably have it running already.
On archlinux enable the avaih-daemon via systemd. The daemon also needs to be running on the raspberry pi for the publishing to work.
If everything worked correctly you should see the audio devices attached to the pi pop up in pavucontrol (after restarting the pipewire-pulse service for the configuration to apply):
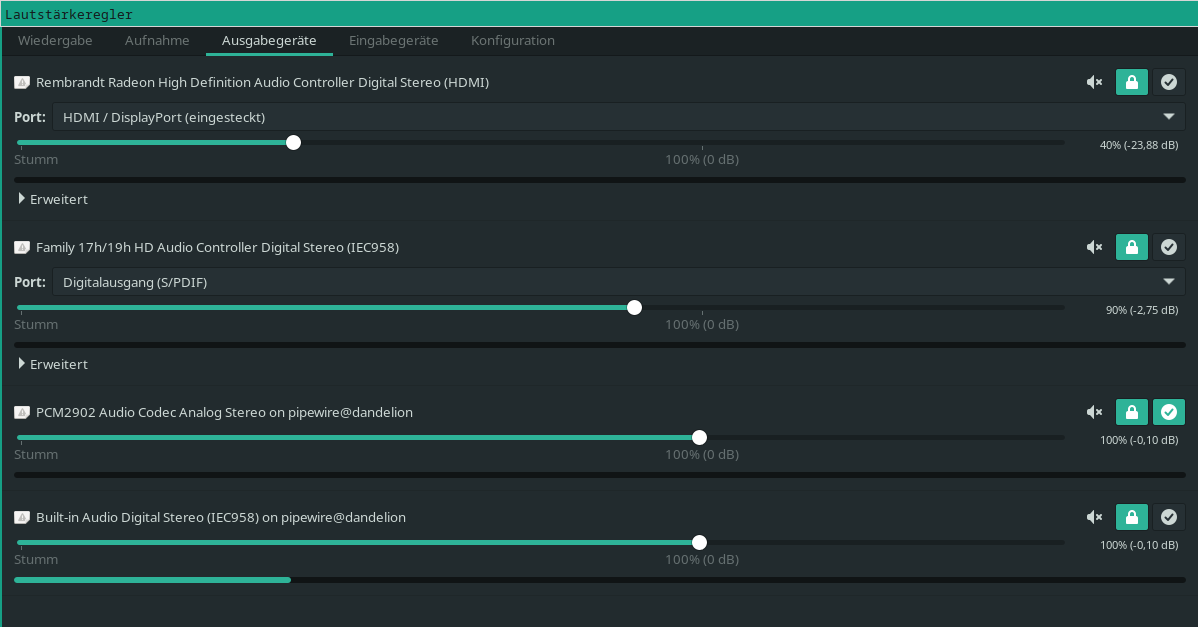
Selecting the playback device or mircophone phone should now just work like with a locally attached the device. The really nice thing about this is that you can even use the devices from multiple clients at the same time!!!
Webcam
In theory pipewire is was written for camera device sharing between multiple applications. For example the webcam software cheese is already using pipewire. But I have found absolutly
zero infromation if it whould be possible to do that via a network. Im not even really sure that this is on the roadmap. If it is I will definitly revisit this topic. The only other option I could think of was to somehow use some form of continous webcam broadcast that I could then somehow attach as a camera, but I also do not want the webcam to be active all the time.
So the solution I have come up with for now is to use USBIP. Which is a client server application to speak the USB protocol via the network. This comes with the drawback that the webcam can only be used by one device at a time, but at least I do not have to physically replug the device. Just issue a command to attach and detach it.
This can be done in a few simple steps:
- Install usbip on server (pi) and client (laptop, desktop)
- Enable the Service on both devices.
- On pi
bindwebcam to usbip daemon - Attach/detach webcam via usbip daemon on the client
So the first to steps are the same for the client and server: Install the usbip package. Depending on your distribution it might be named differently.
The enable the service using systemd: systemctl enable --now usbipd.
The next step is to bind the webcam to the usbipd daemon on the raspberry pi. For this the busid of the device needs to be found. This can be done by
using the usbip utility:
$ usbip list -l
 - busid 1-1.1 (08bb:2902)
   Texas Instruments : PCM2902 Audio Codec (08bb:2902)

 - busid 1-1.2 (046d:08b6)
   Logitech, Inc. : unknown product (046d:08b6)
The webcam is the logitech device. Binding it to the daemon is as simple as running:
$ usbip bind -b 1-1.2
usbip: info: bind device on busid 1-1.2: complete
Now the device can be attached to the client. First we can also check that the device is availible to be attached:
$ usbip list -r 172.16.128.1
Exportable USB devices
======================
 - 172.16.128.1
      1-1.2: Logitech, Inc. : unknown product (046d:08b6)
           : /sys/devices/platform/scb/fd500000.pcie/pci0000:00/0000:00:00.0/0000:01:00.0/usb1/1-1/1-1.2
           : Miscellaneous Device / ? / Interface Association (ef/02/01)
The -r option is used to specify the remote server running usbip in this case the raspberry pi. Attaching/detaching is done with the commands:
$ sudo usbip attach -r 172.16.128.1 -b 1-1.2
$ sudo usbip detach -p 0
With the webcam attached it can be used like any other webcam. For example you could open cheese and take a picture:

After usage the webcam should be detached again, to make it possible for other clients to connect to it. If you forget to detach before powering of the device currently using the camera. You
will login to the pi to unbind and rebind the device again, since usbip does not seem to have a timeout mechanism. A few other things to note about this setup are:
- It is still not possible to use the device from multiple clients at the same time 😥
- To make sure that the camera can only be used via the local VLAN a firewall configuration on the pi is required, since usbip is not confuriable to only listen on a certain network interface.
- If you are getting an error when attaching the camera, you might also need to make sure the
vhci-hcdkernel module is loaded!
I hope you enjoyed this post. If you have any further thoughts or questions. Feel free to reach out to me.